Monday, March 15, 2010

Master Bedroom Closet Project #1

The master bedroom has a ton of closet space for a downtown condo in an 1890's building in Boston.  Two big closets!!  Unfortunately the previous owners did a really poor job of organizing the space which made most of this closet unusable.  I finally got fed up and ripped out the shelves and then went after the supports with a crowbar (which meant I had to do a lot of patching later).  I sadly didn't take photos of the before or the process, but here are the after photos.

The closet originally had big horizontal shelves going all the way across it from left to right.  I put two rods on the left side with enough space under the bottom one for shoes, and then a top shelf over the top rod.  On the right hand side of the closet I made five shelves.  The first shelf starts fairly high up so that there is room to taller items on the bottom (vacuum, laundry hampers, bike pumps, tools, etc.)  In the middle are a few hooks for hats, belts, etc.  Eventually I hope to move the ladder to the basement :)

The floor is linoleum tile, which I covered with a coat of primer, and a few coats of satin finish espresso latex paint. 

The bins are from Bed Bath and Beyond.  The bottom one has dog stuff and the middle one has cleaning supplies, light bulbs, and rags.

The constuction begins

Finally getting around to posting on my condo rehab project.  Here are some good before photos.  Well I have done a little here and there....but nothing substantial.

The master bedroom - already fixed and painted the bow windows and hung some roman shades on the three windows.  Had to get custom shades from Smith + Noble because the windows were unusual sizes.
The traumatized pooch
The awesome ceiling in the master bedroom...
My pink bathroom with no storage
Whoever thought dropped ceilings in residential bathrooms was a good idea should be buried alive under a big pile of wet foam ceiling tiles
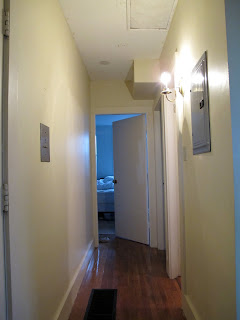
The hall looking towards the second bedroom -  dirty, horrible paint job, industrial electrical panel (which only supplies 30 amps) and to top it off, the intake vent for the heating system right smack in the middle of the floor.  (I will tell you more about the heating system later).

The living room - the roof is getting fixed and in the process we are putting in an access hatch/skylight in my living room, since the building had no access to the roof other than climbing out the small window in my bedroom and scaling the side of the building.  Also note that prior owners left the spot for a wood burning stove...but no stove, oh yes, and they stuffed the hole with newspaper :)

Last but not least, the kitchen - I already pulled up one layer of linoleum when I first moved in because the previous renters had a cat who had left his mark.  I covered the sub floor (which is on top of another layer of linoleum) with rubber industrial floor mats from Home Depot.  I also already tore out some cabinets and covered everything in primer, mostly to get rid of the O de cat.  First major purchase for condo was the stove pictured.  When I moved in the original from 1962 was still here.  Amazingly it worked fine, but since it had a pilot light that burned all the time (no electric ignition) it scared me a tiny bit, so I bought a new one pretty soon after moving in.  I must say it doesn't look half bad in these photos.  I should try to find the true "before" photos I took earlier.